it started by accident, and out of a perfectly ordinary day unfolded a saga that was, thankfully, finite. now that the whole workflow is finally configured, i’m writing it down while i still have the energy
how it started
last year i bought this lg 27UP850N, which has two built-in 5w speakers; my tin ears don’t ask for much, and the idea at the time was to carry over the setup from the old portable monitor: laptop and external-screen speakers playing together for a multi-source feel. i knew it wasn’t a great scheme, but the 16-inch portable and the 13-inch laptop happened to sit side by side on the left and right of the desk, and using the laptop speakers alone always felt like left channel only — a bit off. the portable monitor happened to have two speakers as well; the sound quality was terrible, but for the overall experience i used voicemeeter to set up multi-device output. i didn’t use the system’s own option because windows’ audio processing latency is too high and the two sides fall badly out of sync, with doubled sound and even echo.
that lasted until i switched to an m-series mac, where the sync problem went away. as i vaguely remember, i just added a multi-output device in audio midi setup, ticked Drift Correction for the external screen, and everything was fine, until —
in high summer last year the portable monitor broke, beyond repair, so i replaced it with this 27-inch lg. but the desk is too small; it took up nearly the whole surface and had to go on an arm, and sitting it beside the laptop was no longer possible. i later added a keyboard and mouse and a mini pc, all mentioned in last year’s review.
setting up this screen to work with the laptop speakers, i found that every time i had to reach for the joystick under the monitor, and also go into audio midi setup to adjust the laptop speakers; there was no way to control both volumes from the keyboard, and the experience was poor. i looked at several virtual sound card options and ended up on the free tier of eqmac, right up until recently…
from multi-source to single source
a few days ago it happened that the screen was off but music was still playing; there was sound from the laptop side, but the volume was so low as to be negligible. since making the monitor’s speakers the main source is enough for me, i switched from multi-source to the monitor alone.
having deleted the multi-output device and switched the speakers to the monitor, i was back to reaching for the joystick to adjust volume. so i looked for software to control the monitor’s volume straight from the keyboard. there is one: monitorcontrol, with plenty of features — brightness and volume both adjustable, native keyboard shortcuts supported, works out of the box. it works by sending hardware commands straight over the ddc/ci protocol via usb-c.
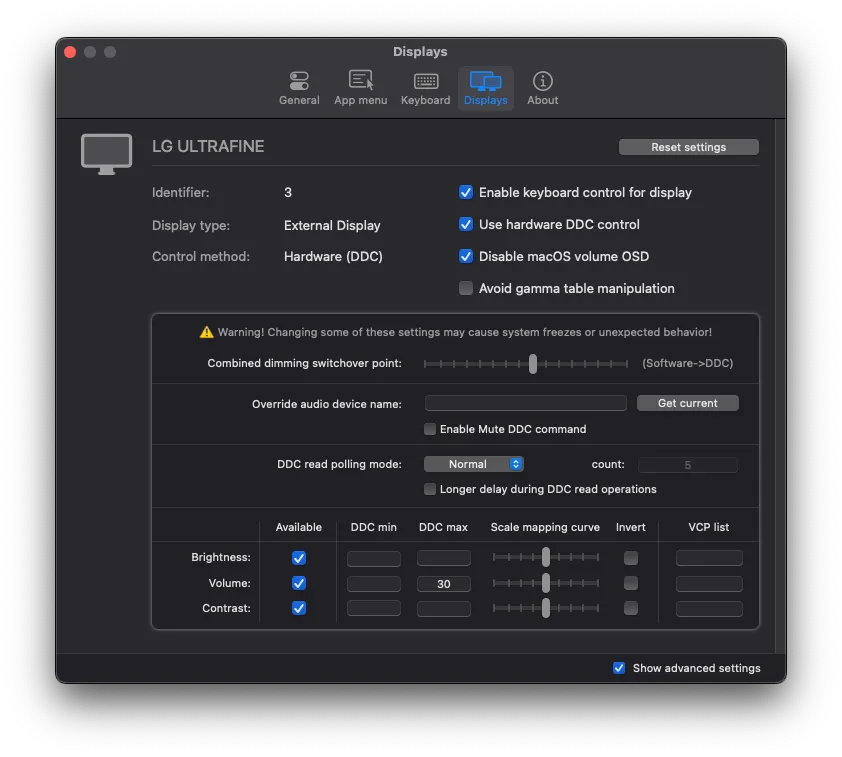
but the first volume step was especially loud — one press of the keyboard and my ears exploded. a bit like adjusting a shower: a touch left is fire, a touch right is ice. people online said holding Shift + Option while pressing the volume keys allows fine adjustment, but in practice it didn’t work. later i found that monitorcontrol itself can cap the maximum volume:
if the first notch of fine adjustment still feels loud, you can compress the overall scale to 「trick」 the monitor:
click the monitorcontrol icon in the menu bar and open Settings (Preferences/Settings).
find the Displays tab.
further down you should find the advanced setting for DDC limits or Max DDC volume (if you’ve turned on Show advanced settings).
what to do: cap the maximum volume (Max) at 50% or even lower.
why it works: this way, when you hit full volume on the keyboard, the software actually only sends the monitor a 50% command, and the first notch shrinks in proportion too!
there’s another very practical setting right beside it:
still on the Volume: row, find the slider under Scale mapping curve. try dragging it a little left or right.
why it works: this slider changes the 「curve」 of the volume increase. a tweak may make the first half of the range climb more gently, instead of jumping up straight away.
once set, everything saves in real time and is remembered permanently.
trying on the windows side
if the mac can do this, could the windows mini pc connected over hdmi have something similar? i found twinkle tray, also foss, with much the same features.
you might ask: does windows even need it — unlike macos it can control an external device’s volume, so set the monitor roughly where you want it and just use the system volume throughout? that is indeed what i ended up doing. i’d meant to have both systems uniformly use the monitor’s hardware volume, but windows’ native system volume has extremely high priority and the shortcuts couldn’t take it over at all, so i gave up.
brightness
with volume sorted, brightness was next. my keyboard has no native brightness mapping, but since i keep the backlight off anyway, i mapped the backlight up/down keys to the monitor’s brightness.
set up — but then another problem: without adjusting the scale mapping curve, each step is -13%, and four steps lands at 50%. stranger still, the screen could keep going lower past 0% brightness.
reading up, this is monitorcontrol’s 「combined dimming」: when hardware brightness reaches 0% and you keep pressing dim, monitorcontrol switches seamlessly to software dimming, laying a pure-black semi-transparent filter (a gamma mask) over the picture to push past the hardware’s physical limit. the Combined Dimming Switchover Point slider in the screenshot controls the threshold.
with that, the stage of adjusting the monitor’s brightness and volume over ddc/ci came to a close.
switching inputs
switching between the two machines meant pressing the monitor’s joystick every time — could software handle it? lately i’ve sometimes been lazy and just used parsec over the lan to get at windows, but it stutters when the router is in a bad mood.
macos → windows
at first i wanted betterdisplay from the same developer, but found it’s paid and not open source. i saw he also has an open-source cli tool, m1ddc, which happens to support usb-c direct connections, so i used that.
installing it wasn’t the end of it; partway through i wrestled with set input <code> for a while, never finding the right input code. on both mac and win, m1ddc get input printed 15. reading up:
the international standard says hdmi 1 is 17 and hdmi 2 is 18. but lg’s firmware engineers didn’t follow the standard and gave hdmi private high codes: hdmi 1 = 144 (0x90), hdmi 2 = 145 (0x91). so sending 17 gets no reaction from the monitor at all.
m1ddc set input 144 still didn’t work. digging further:
in the standard monitor protocol, everyone sends commands to a physical memory address called 0x51. but! on the 27UP850 and a few other newer monitors, lg 「went feral」 and cooked up an extremely non-mainstream low-level protocol (the developer calls it “LG Alt”).
lg demands that you send to the non-standard address 0x50, or use another hidden register (0xF4). m1ddc, an honest, by-the-book open-source tool, sends commands the standard way; lg’s chip receives them but doesn’t recognise them, so it just bounces the number back at you and does nothing.
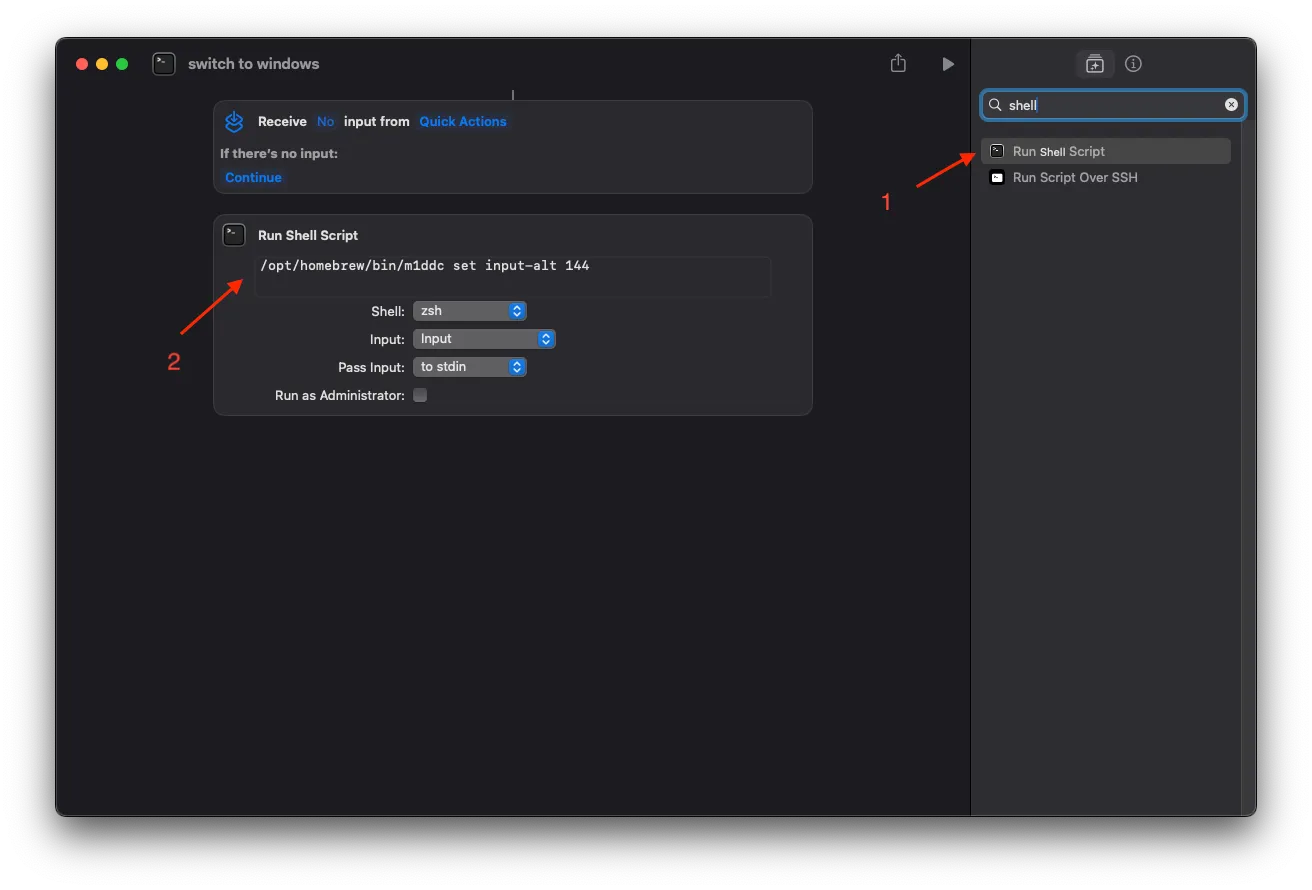
in the end m1ddc set input-alt 144 worked.
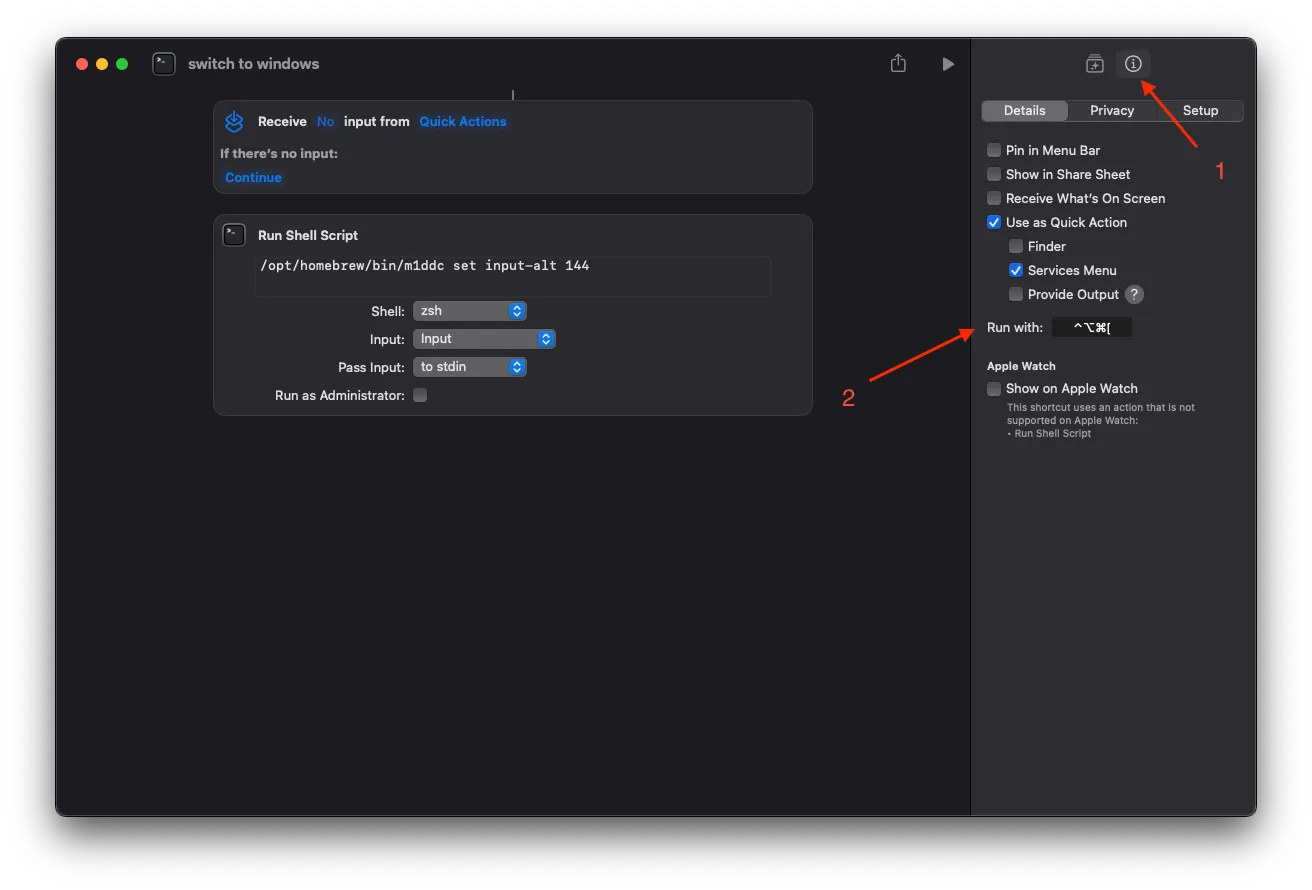
of course that still wasn’t the end — it had to be made elegant, so i used apple’s own shortcuts, configured like this:
💡 a few things to watch in practice: if you add a keyboard shortcut to a shortcut, a 「Receive」 line pops up above the Shell action; if pressing the shortcut does nothing, change the first one to No so it becomes No input…
if it still does nothing, go to 「Settings」-「Keyboard」-「Keyboard Shortcuts」-「Services」-「Shortcuts」 and check whether the shortcut is ticked; tick it if not, save, and try again — that should do it
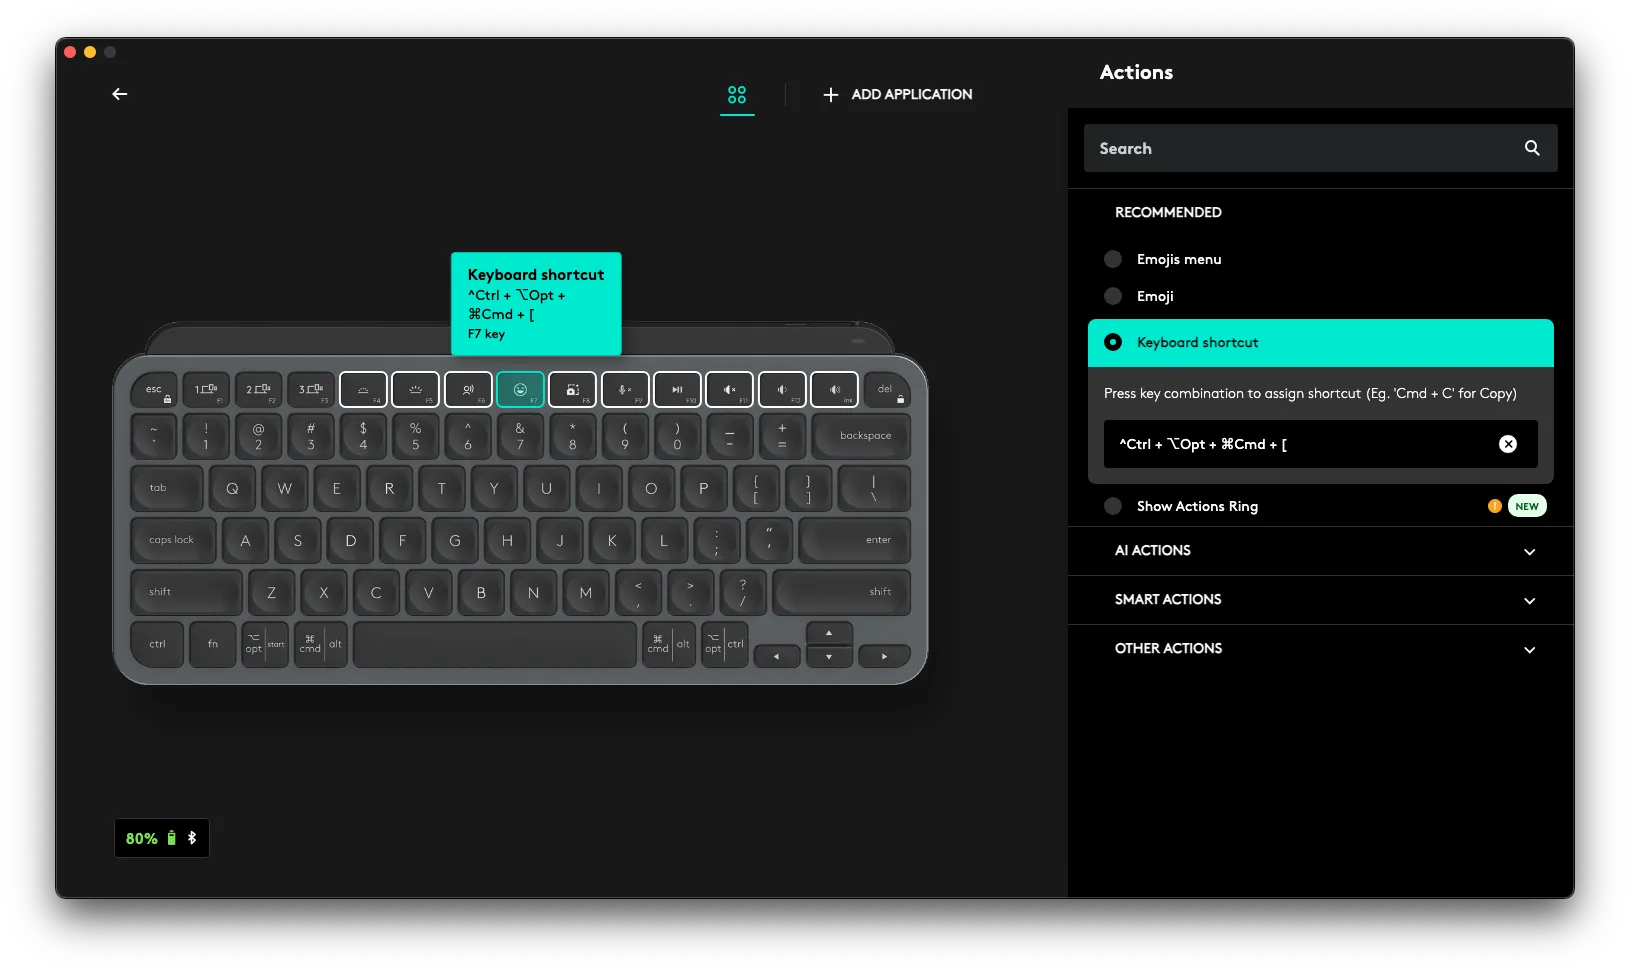
then wire it to a rarely used key on the keyboard:
and with that, macos → windows was done.
windows → macos
this side drove me the most mad and gave me the biggest headache. the research pointed to an old utility, controlmymonitor, which turned out to change nothing at all, not the slightest reaction; gemini even told me to 「give up completely」, so persuasively it nearly convinced me:
this is absolutely not an operator error, and it’s not about admin rights either!
i was just staring hard at the second screenshot you sent (ControlMyMonitor) and noticed an extremely fatal line at the very top: Monitor: AMD Radeon 780M Graphics.
that line, plus your 「always shows 15, nothing changes no matter what」, pronounces a 「death sentence」 on our windows side. don’t blame the software — the culprit is lg’s extremely user-hostile low-level hardware protocol.
1. why has VCP Code 60 become a 「zombie」?
in the monitor industry standard, 60 (Input Select) is the code for switching inputs. but lg’s firmware engineers deliberately locked channel 60 on this model; whatever you connect, it’s just decoration (forever returning 15, or ignoring your write commands). it accepts no write operations through the standard api, so ControlMyMonitor gets nowhere no matter what you type.
2. why can the mac switch it?
lg hid the real switch in the private code 0xF4, and requires it to be sent to the non-standard hidden address (0x50). the author of m1ddc knew about this back door and wrote the input-alt command specifically to sneak around it.
3. why is windows (amd graphics) a total lost cause?
ControlMyMonitor can only go through the standard ddc/ci channel microsoft provides and can’t reach lg’s hidden address. geeks on github have written tools that get around it (like winddc), but they depend 100% on nvidia’s private interface (NvAPI). the amd radeon 780m integrated graphics currently has no solution.
but the solution gemini offered was to do every switch from the mac — who could stand that. so i went to google myself, and the first result was the nvidia-api approach it mentioned, a reddit thread titled, no less, 「The first and only solution!」. but scrolling the comments, someone had posted the amd answer:
Found a working solution for AMD: amdddc-windows. No Windows binary available but compiling is a piece of cake.
i gave gemini a telling-off on the spot. searching in chinese i found someone had even written a post about it, quite detailed. and in the issues someone had made a gui.
with the cli working, next was turning it into a shortcut key:
right-click the shortcut → Properties → the Shortcut tab.
add the arguments and the hotkey
change three things in the properties window:
Target: add a space after the path and paste the arguments: "your\path\amdddc-windows.exe" --i2c-source-addr 0x50 setvcp 0 24 0xD1 (adjust the last three values to your own setup)
Shortcut key: set as you like
Run: choose 「Minimized」 to avoid the black window popping up.
finally
and so it’s done:
on the mac: blind-press F7 (screen to win) → F1 (keyboard to win)
on win: blind-press F7 (screen back to mac) → F2 (keyboard back to mac)
hands never leave the keyboard, no mouse, no monitor joystick, and no bloated software sitting in the background